
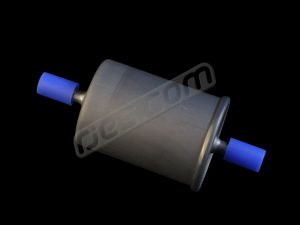
M18 x 1.0 Positional* 12mm Tank Outlet and Strainer
part no. 800-00074 Price £25.83 GBP + VAT (£31.00)
Designed to be the best possible way to join a 12mm hose for an injection pump to for the air cooled models with an M18x1.0 threaded fuel tank outlet, this outlet is as compact as possible without compromising flow into the pump:

Fits all the air cooled models with the M18x1.0 male outlet thread (most carburettor bay, Beetle, Type 3, and all 914 models, etc). To suit 12mm bore hose directly to an injection pump inlet. Supplied with a good quality tank strainer. The outlet being a positional elbow makes routing 12mm hose much easier, as it’s not very flexible, and can reduce the length of 12mm SAE J30 R9 hose needed (it’s expensive) between the tank and pump.
Electroless nickel plated, to guarantee good quality coverage all over (electroplating parts with captive nuts such as this is unreliable, as the nut and pipe always mask part of each other from the electric field) . Electroless nickel is considerably more expensive than zinc electroplating, but it’s the best way to plate a fitting with a captive nut such as this.
Don’t install a fibre washer between the tank thread and strainer, as shown in VW manuals. The aluminium ring at the bottom of the strainer supplied is very soft, and works perfectly as a seal without a fibre washer.
*Positional fittings like this can be installed in any angle regardless of what position the thread locks at. This is important when such a large diameter hose is needed, as they’re not very flexible.
Injection Filter
part no. 100-00032 Price: £10.00 GBP + VAT (£12.00)
Injection filter for use between the pump and engine fuel inlet (not anywhere else!).
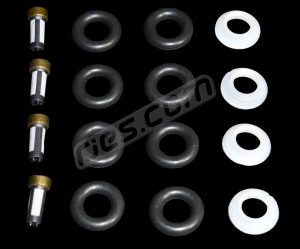
FBJC100 Fuel Injector Service Kit
part no. 800-00054, Price £20 GBP + VAT (£24.00)
O-rings, filters and pintle cap set for all the models using the Unisia Jecs FBJC100 type injectors. In European / ‘rest of world’ spec Subaru models these are the EJ201 and EJ251’s from normally aspirated MY00 -03 Legacy, MY00-07 Impreza, and MT02-07 Forester EJ201 and EJ251 models without air assist injection.
The kit consists of 8 Viton o-rings, 4 filters and 4 pintle caps:
This is the FBJC100 type Subaru injector that this kit fits (injector(s) not included):
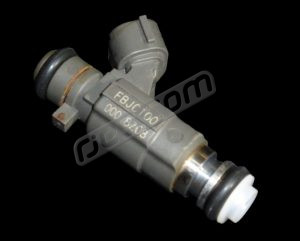
FBJC100 injectors were used in the other Subaru markets (i.e. Japan and the USA) too, but not necessarily in the same years and models listed above. This is due to the Japanese spec and US spec models being built with unique managament systems not uses elsewhere, because of the unique emissions rules in these markets. Some models used them from MY99 in these markets, and the US spec EJ221 probably used them too.
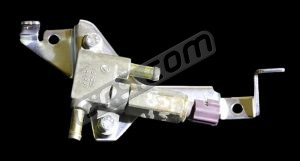
Note this set does not fit the very similar looking FBLC100 injectors. Models with air assist injection (I.e. the OBD II models which have an atmospheric air pressure sensor mounted in the engine compartment and no EGR) use FBLC100 injectors, the top part of which looks identical to FBJC100 (apart from the lettering). However they have a very different design from the stainless steel part down – i.e. where the injector fits into the manifold. We can’t get all of the seals for the FBLC100 injectors. The easiest way to know whether your engine has air assist injection id to look for the presence of the air assist injection valve, as shown below, next to the coil:
Subaru Fuel System in a VW FAQ:
If you want to know more about the history of fuel injection fuel systems in detail, and why how they are plumbed is critical to the success of your fuel system and the life of your fuel pump, see Bosch Electronic Fuel Injection Fuel Supply System History
For questions more to do with the specific products on this page, please see the following FAQ: